Monday, December 27, 2010

Sewing again!

I have been sewing lately, just the Christmas gift aprons that I bought fabric for a few months ago. The first was for my mum. It was a rush at the end so I don't have a shot of the finished apron. Here are a few WIP photos:
Cutting out. I should really get a proper cutting ruler.

Preparing the pockets.

Top section waiting to be attached to the waistband. If you compare with the first apron I made with this pattern, you can see that I made the straps wider and halved the width of the ruffles. This looked much better.
I hope to get a shot of the finished apron sometime soon. Currently I'm about 80% of the way through another of these, in a different fabric, for another relative. There is one more to do after that, which I hope to have finished within the week.

After that there are many sewing projects I could start. While up to now I've preferred sewing clothing, I keep seeing quilting things on the web to the point where I'm thinking of trying a small quilt. My girls keep raiding the linen cupboard for towels to use as dolls' blankets and pillows, so a doll quilt (or several) would be a useful and manageable start to quilting. Hmm, better just get the aprons done and go from there.

Friday, December 3, 2010

Missed one! And my yellow sailor

It was Helen's birthday a couple of weeks ago, and I made her a superhero cape as one of her presents. However, I still haven't photographed it - must fix that.

Last night Helen's school had their end of year concert. Thankfully the little kids performed first. Helen's class sang "Yellow Submarine" and the costume request was for yellow or nautical clothing. I found a cheap yellow t-shirt and a yellow women's tank top. I cut the top off and made the bottom part into a skirt. It needed something else, so I dug out some white broadcloth, googled for tutorials, and added a sailor's collar.

Shirt and sketch for collar pattern:


Skirt and collar cut out:


I didn't have any suitable ribbon or trim for the collar, so in its place I stitched parallel lines with yellow thread. I used a stretch stitch to make it stand out more (the stretch stich on my machine does a back stitch every second stitch, so the finished effect is twice as thick as a straight stitch).

Collar in place (but not attached):


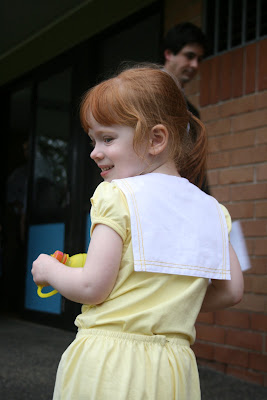
My little sailor with her yellow submarine. The collar is pulling because it is just safety pinned on at the points after she put the shirt on - it wouldn't fit over her head if it was sewn on. I'm not sure if the skirt is really wonky or if it's the way she's wearing it (rush job - could very well be wonky!).


Rear view. I accidentally made the waist too large and had to pin it.

Saturday, November 27, 2010

Queen Helen

Here is Helen in her costume. The crown is a $2 shop find, held on with thin elastic and red ribbon. The party day was quite cold for November, so she needed a spencer underneath the dress - a long sleeved dress would have been fine!

She had a great time, as did the other kids. I was impressed that even though it wasn't a huge party, there were two other kids there in handmade costumes, including the birthday girl. All the kids looked really cute.

Sunday, October 31, 2010

It's now a dress...

I made the skirt to go with the top for Helen's queen costume, but when she tired them on, there was a lot of tummy showing when she moved around. It was obvious that it would be better as a one piece dress. After I persuaded her to take off the skirt, I removed the waistband and sewed the skirt to the top. It sounds simple, but it actually took a lot of work to make everything sit right. There was also a lot of hand sewing involved so that the stitching wouldn't show on the outside. It would have been a lot simpler to make it a dress right from the beginning! Oh, well. Done now.
Definitely a hack job, but here it is:


Apologies for the overexposed photo - the centre panel is a deeper gold than it appears here. I found her a pair of gold ballet flats to wear with the costume. I might have to buy the crown rather than make it, as things are pretty crazy here with moving house.

Saturday, October 23, 2010

Sleeves

I worked on the sleeves today for the queen costume. I have virtually no experience working with very sheer fabrics, and none at all with crystal organza. The stuff is evil! It frayed like crazy, but eventually I got the sleeve seams and edges done (with the same gold braid as the bodice). I just hope it holds up ok. The next step is to set them into the bodice.

Queen costume progress

After a few more calicos, last night I got stuck into the real fabric. Cut and sewed the main part of the bodice. Rather than fiddling with facings, I decided to do a full lining. We are getting some very warm days already, so I used the lightest fabric I had on hand for the lining - a very thin muslin. Ideally the lining would be red, but hey, it's just a costume!
I realised when sewing this up that my construction method has some bad mistakes (the way the centre panel is attached). Again, it's just a costume, so I fudged it and forged ahead, rather than spending more time trying to figure out a better method.
The trim didn't handle the tight curve on the bottom front edge as well as I'd hoped. Might redo that part if I get time.
It still needs sleeves and a zipper/other fastening.

Sunday, October 17, 2010

Queen costume: bodice and sleeve shapes

I mentioned yesterday that I'm making a queen costume for Helen. I decided to make a seperate top and skirt to make toileting easier.
Below is a photo of my first calico mockup for the top. The sleeve on the right is my first attempt - definitely not puffy enough. After that, I googled for puff sleeve tutorials to get a better sleeve shape. You can see the result on the left - much better! The bodice is still too short, although it would probably be ok if I was going to sew the skirt to it. The fit is fine otherwise, at least for a costume, although I might modify it a bit to better accomodate her tummy shape.


Here, you can see how different the pattern pieces are for these two sleeves. (The piece on the left is cut on the fold, with some width added at the fold).