Monday, December 27, 2010

Sewing again!

I have been sewing lately, just the Christmas gift aprons that I bought fabric for a few months ago. The first was for my mum. It was a rush at the end so I don't have a shot of the finished apron. Here are a few WIP photos:
Cutting out. I should really get a proper cutting ruler.

Preparing the pockets.

Top section waiting to be attached to the waistband. If you compare with the first apron I made with this pattern, you can see that I made the straps wider and halved the width of the ruffles. This looked much better.
I hope to get a shot of the finished apron sometime soon. Currently I'm about 80% of the way through another of these, in a different fabric, for another relative. There is one more to do after that, which I hope to have finished within the week.

After that there are many sewing projects I could start. While up to now I've preferred sewing clothing, I keep seeing quilting things on the web to the point where I'm thinking of trying a small quilt. My girls keep raiding the linen cupboard for towels to use as dolls' blankets and pillows, so a doll quilt (or several) would be a useful and manageable start to quilting. Hmm, better just get the aprons done and go from there.

Friday, December 3, 2010

Missed one! And my yellow sailor

It was Helen's birthday a couple of weeks ago, and I made her a superhero cape as one of her presents. However, I still haven't photographed it - must fix that.

Last night Helen's school had their end of year concert. Thankfully the little kids performed first. Helen's class sang "Yellow Submarine" and the costume request was for yellow or nautical clothing. I found a cheap yellow t-shirt and a yellow women's tank top. I cut the top off and made the bottom part into a skirt. It needed something else, so I dug out some white broadcloth, googled for tutorials, and added a sailor's collar.

Shirt and sketch for collar pattern:


Skirt and collar cut out:


I didn't have any suitable ribbon or trim for the collar, so in its place I stitched parallel lines with yellow thread. I used a stretch stitch to make it stand out more (the stretch stich on my machine does a back stitch every second stitch, so the finished effect is twice as thick as a straight stitch).

Collar in place (but not attached):


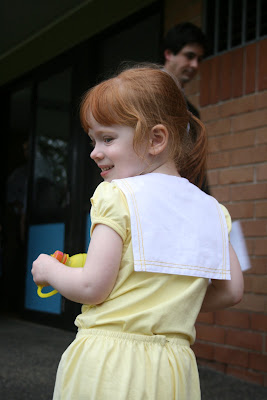
My little sailor with her yellow submarine. The collar is pulling because it is just safety pinned on at the points after she put the shirt on - it wouldn't fit over her head if it was sewn on. I'm not sure if the skirt is really wonky or if it's the way she's wearing it (rush job - could very well be wonky!).


Rear view. I accidentally made the waist too large and had to pin it.

Saturday, November 27, 2010

Queen Helen

Here is Helen in her costume. The crown is a $2 shop find, held on with thin elastic and red ribbon. The party day was quite cold for November, so she needed a spencer underneath the dress - a long sleeved dress would have been fine!

She had a great time, as did the other kids. I was impressed that even though it wasn't a huge party, there were two other kids there in handmade costumes, including the birthday girl. All the kids looked really cute.

Sunday, October 31, 2010

It's now a dress...

I made the skirt to go with the top for Helen's queen costume, but when she tired them on, there was a lot of tummy showing when she moved around. It was obvious that it would be better as a one piece dress. After I persuaded her to take off the skirt, I removed the waistband and sewed the skirt to the top. It sounds simple, but it actually took a lot of work to make everything sit right. There was also a lot of hand sewing involved so that the stitching wouldn't show on the outside. It would have been a lot simpler to make it a dress right from the beginning! Oh, well. Done now.
Definitely a hack job, but here it is:


Apologies for the overexposed photo - the centre panel is a deeper gold than it appears here. I found her a pair of gold ballet flats to wear with the costume. I might have to buy the crown rather than make it, as things are pretty crazy here with moving house.

Saturday, October 23, 2010

Sleeves

I worked on the sleeves today for the queen costume. I have virtually no experience working with very sheer fabrics, and none at all with crystal organza. The stuff is evil! It frayed like crazy, but eventually I got the sleeve seams and edges done (with the same gold braid as the bodice). I just hope it holds up ok. The next step is to set them into the bodice.

Queen costume progress

After a few more calicos, last night I got stuck into the real fabric. Cut and sewed the main part of the bodice. Rather than fiddling with facings, I decided to do a full lining. We are getting some very warm days already, so I used the lightest fabric I had on hand for the lining - a very thin muslin. Ideally the lining would be red, but hey, it's just a costume!
I realised when sewing this up that my construction method has some bad mistakes (the way the centre panel is attached). Again, it's just a costume, so I fudged it and forged ahead, rather than spending more time trying to figure out a better method.
The trim didn't handle the tight curve on the bottom front edge as well as I'd hoped. Might redo that part if I get time.
It still needs sleeves and a zipper/other fastening.

Sunday, October 17, 2010

Queen costume: bodice and sleeve shapes

I mentioned yesterday that I'm making a queen costume for Helen. I decided to make a seperate top and skirt to make toileting easier.
Below is a photo of my first calico mockup for the top. The sleeve on the right is my first attempt - definitely not puffy enough. After that, I googled for puff sleeve tutorials to get a better sleeve shape. You can see the result on the left - much better! The bodice is still too short, although it would probably be ok if I was going to sew the skirt to it. The fit is fine otherwise, at least for a costume, although I might modify it a bit to better accomodate her tummy shape.


Here, you can see how different the pattern pieces are for these two sleeves. (The piece on the left is cut on the fold, with some width added at the fold).

The finished apron

The photos aren't great, but you get the idea:


Yup, the ruffles are definitely too wide! Hands in pockets so you can see where the pockets are.


Rear view.

Saturday, October 16, 2010

Apron - day seven

I managed to finish the apron tonight! The last few steps went quicker than I expected, except that I sewed the buttons on the wrong side, so I had to take them off and sew them on the correct side.
I'll take photos tomorrow when the light is better.

My next project is a queen costume for Helen - she's been invited to a "Majestic Princess" dress up party. I've heavily modified a vintage dress pattern and sewed a calico test bodice today, but it was too short (even though I lengthened the original). Hopefully the next draft will fit and I can squeeze in sewing the whole costume before we move, since the party is only a few days after the move and I'm sure unpacking will be the priority in that time.

Friday, October 15, 2010

Apron - day six

Actually, it's partly day five continued, as I sewed a bit more last night after I posted.
Last night I sewed the waistband to the bib and sewed the ties to the waistband.
My internet connection was down for most of today and I couldn't access the tutorial, so it was either do no sewing or wing it based on my hazy memory of reading through the tutorial when I first found it a few weeks back. I gave it a go, and now that I can see the tutorial again, can see that my memory was pretty much correct. I managed to sew the skirt to the waistband, which means all the pieces are sewn together. I am part way through hand stitching the inside waistband section in place.
I'm not sure if I'll achieve my goal of completing the apron in seven days, given that tomorrow is Saturday and we have to do some packing, which could limit sewing time. It will be close either way.
Sorry, no photo today.

Thursday, October 14, 2010

Apron - day five: Construction has begun!

Heather slept well today, so I was able to attach the shoulder ruffles and straps to the bib section (steps 9-11). Well, except pressing the seams at the end.

Straps sewn to bib and ruffles basted on:


Strap seams completed (this was tricky!):


Now that the top section is basically put together, I can see things I'll definitely change next time. I think the ruffles are too wide - almost ridiculous, actually - and the straps are too narrow. Maybe I made the hems on the ruffles too narrow, but either way they're still too wide. Widening the straps will also make construction easier, since the bib and other strap has to be tucked inside the strap tube when sewing the second seam (this is what made that part tricky).

Wednesday, October 13, 2010

Apron - day four

My mum came over to help me start packing for our move, so I didn't get sewing time today. I couldn't go to bed without doing something though, so tonight I pressed and sewed the hems on the shoulder ruffles (step 8). Step 8 also has instructions to sew the gathering stitches for the ruffles, but that will have to wait.
The last few steps have involved preparing individual pieces. I'm looking forward to actually assembling this thing!

Tuesday, October 12, 2010

Apron - day three

Today I completed steps 6 and 7: preparing the ties and assembling the bib section. The narrow hems on the edges of the ties gave me fits. I actually have a narrow hemming foot that makes a 4mm rolled hem (like a shirt hem), so I tried that first, but kept having problems with it. I didn't persevere long enough to be sure, but I suspect that the weave of the quilting cotton is a bit too open to work well with this particular foot. Shirting cotton is certainly thinner and more tightly woven, and I've successfully used this foot before with a somewhat more tightly woven printed dressmaking cotton fabric. In the end I pressed it manually and then stitched the hem, as per the instructions.
The other sewing frustration of today was discovering that a certain little person had taken to the hem of yesterday's skirt section with her craft scissors :/. Thankfully she didn't do a huge amount of damage and it was not in a prominent spot. She admitted, when questioned, that she'd been trying to make a bandage! I was able to fix it with some makeshift machine darning using a 3 step zigzag.
Sorry, no photos today.

Monday, October 11, 2010

Apron - day two

Today I completed steps 3 to 5 (going by the tutorial page numbers) of my apron. I hemmed the skirt, sewed the gathering stitches on the skirt (not gathered until a later step though), prepared the pockets and sewed them onto the skirt.

Due to the busy print, you can barely see the pockets in this photo. It made me realise that this was probably a good fabric choice for an apron - apart from having pictures of aprons, kitchen equipment and food on it, it will hide any stains really well!

Saturday, October 9, 2010

Time for an apron sew-along!

A few weeks back, I decided to make aprons for some family members for Christmas gifts. A few people on EB have joined in too - some are making aprons for their kids, and others are making adult sized aprons.
I started mine today. I'm using a free retro apron tutorial I found here. I bought enough fabric for four different aprons from Hawthorne Threads, and some coordinates and trim from Craft Depot. However, to try out the pattern for the first time, I'm sewing an apron for myself using an apron print that was in the clearance bin at Craft Depot.

Here are my fabrics. The paper is the pattern cutting diagram.


Ready to cut (and label):


The pieces all cut out:


That's it so far.

Friday, October 8, 2010

More undies...

The other day I finished a few more pairs of side snap undies, like the ones in my earlier post.


There may be one or two pairs in the wash in addition to the four shown here - I didn't keep count. Unfortunately Heather doesn't want to wear them, though she may yet change her mind. Target has underwear on sale this week, so I bought two packs of ordinary undies for her and we're just having to be extra careful taking them off when there's a number two miss.
Next up is an apron sew-along (through EB), starting on Sunday. I hope to be posting daily for a week while I work on it. I have several aprons to make, but my goal is just to complete one next week. Any more will be a bonus.

Tuesday, September 28, 2010

Shorts & bloomers

Here are some more shorts for Heather. I based them on the Candy pants pattern, but I think they're a bit wide and the cuff is boyish, although the gathered pockets keep them on the girly side. I made the casing too wide for the elastic - oops.


Bloomers to go with the dress I made recently.


Makeshift tag from a scrap of microfleece. I think my girls think that clothing tags exist purely for the purpose of indicating the inside back of a garment!

Saturday, September 25, 2010

Candy pants #2

Here is Helen wearing her pair. Thankfully, although she insisted on the same fabrics as Heather's pants, she wanted different appliques, so they are easy to tell apart.
This is a 98 with the 110 length, which I think was a mistake. It's just too baggy a style to have as long pants, at least on an older child. However, I think they would look good just under the knee or a bit shorter.
The rise is a bit long too, especially at the front - easy to change next time.

Candy pants

I finished the pants last night and Heather wore them today - she seemed to like them, and insists that the flower applique is actually a cloud, and so they are now her "cloud pants". Her big sister loved them (with some jealousy in there too) and insisted on a pair for herself, so I made a good start on those today.

The length looks ok here, but is a little odd with shoes - too short for pants, too long to be capris. I will probably make any future pairs a little shorter.


Friday, September 24, 2010

Kids clothes week challenge

Last week I stumbled upon Elsie Marley's Kids Clothes Week Challenge, a few days before it started. I love the idea, but life being pretty crazy right now, and with not a lot of time to plan for it, I decided not to sign up. However, it is still motivating me to get some things done. Another motivation is that a certain little girl in our house is just about ready to be out of nappies, but I want to have some extra pants and a stash of side snap undies on hand before we make the switch. It's school holidays, so an ideal time as we don't have to be out of the house as much.
Here are a couple of things:

Side snap undies
My own pattern. Still tweaking it, which I seem to do every time I dig it out. Once the pattern is right, there will be a production line for these. I've made these before with leg/waist bands and also turned and topstitched, but not with coverstitched binding. The binding was surprisingly easy to do, although you can see in the picture I was still trying to figure out the ideal position to place the binding attachment. I also made a pair a few days ago, but they were still in the wash when I photographed this one.


These are a test pair, so I didn't pay too much attention to placement. Outer is embroidered cotton interlock which has been sitting in my stash for a few years. I bought it for baby clothes, but realised afterwards that the embroidery would be irritating and is also too widely spaced. Inner is plain cotton interlock, and binding is poly/cotton ribbing.
Yeah, didn't bother changing overlocker threads either.


WIP: A new pants pattern
Pattern #9 "Candy" pants from Ottobre 1/2008.
If the seams look puckered, they are. Something's off with the overlocker tension and I will be very glad to pick up my newly serviced BabyLock next week. I can live with the puckering since it's a test pair, and they can just be outside play pants. Otherwise, it's coming together pretty well and I'm reasonably happy with the applique, something I've done very little of.
I picked up this fabric from Spotlight the other day - a lovely, light, denim-look cotton (is that still chambray if it's dark like this?). I think it will be very versatile for warm weather clothes.

Tuesday, September 21, 2010

Last parcel for the EB kids' clothing swap!

Yesterday I received a parcel from Melissa (MeLFunKTioN) with a lovely outfit for Heather. The body of the peasant top/dress is fully lined and the whole thing is just really cute and well made. There are matching pants and Melissa also included a full metre of the main fabric. Thank you, Melissa!

Sunday, September 12, 2010

A birthday dress

I made a late decision to make Heather a dress for her birthday. I intended to use purple/ish fabric, but the purple options at the local fabric shop didn't speak to me as much as this fabric, and I didn't have time to look elsewhere. Being a rush job, the pattern is very simple and the sewing is far from perfect, but I think she looks cute in it. As you can see, there is plenty of growing room too, so it should fit her right through summer. I used the tutorial at inditutes for the top (I used the straight sided option rather than A line), except I used my own method for applying elastic to the sleeves. Sewing hack that I am, the rest was made up as I went along.

Saturday, September 11, 2010

Red

Jade has opened the parcel I sent for Emily and has some great modelling shots on her blog. One belt has red and white stripes, and the other is made from the same polka dot fabric as the main part of the dress. The hat is slightly modified from a free online tutorial, and I made three scrunchies with left over fabric. Here are a few photos I took before I sent the parcel:

Tuesday, September 7, 2010

The emergency button dress

I promised Helen a new dress for preschool photo day (she needs summer dresses anyway) and took her fabric shopping. Despite her usual assertion that red is her favourite colour, and my attempts to sway her to something less, um, loud, she picked a hot pink fabric with white pin stripes.
I picked an Ottobre blouse pattern and lengthened it to make a dress. It was all humming along nicely, and last night it was almost finished, bar the buttons and button holes. I thought that photo day was Wednesday, but this morning at preschool drop-off, I realised that photo day was today! I panicked a bit about the potential meltdown that might happen when Helen realised she wasn't wearing her new dress for the photos, but the teacher assured me that the photographer wasn't arriving until 10.30. It was worth a shot.
I went straight to the shops to buy buttons (had to wait for the shop to open!), then straight home to the sewing machine. I hastily marked out the spacing and sewed the button holes, then started sewing on the buttons. Having run out of time, I used safety pins to attach the last three buttons and raced back to preschool. Thankfully they had decided to photograph the other class first, and Helen got to wear her new dress. Later, she modelled for me at home (sorry about the wrinkles, it was stuffed into her bag a few times today):